Lately, we have received lots of questions about Advrcntr3 Dll. Here introduces several common Advrcntr3 Dll which people come across. Read the post below and you will find that fixing Advrcntr3 Dll error is rather easy.
Advrcntr3 Dll issues can be troubleshooted by SmartPCFixer with simple clicks –
Fix Advrcntr3 Dll Now.
The post will introduces what is Advrcntr3 Dll? How to resolve Advrcntr3 Dll problem?
Symptoms of Advrcntr3 Dll
Advrcntr3 Dll problem appeared while your computer is unstable and critical system files fails to respond or starts missing. It happens when your computer is not being maintained regularly. To prevent from further damage and bad effect you need to fix this error at once.
How to Remove Advrcntr3 Dll Problem?
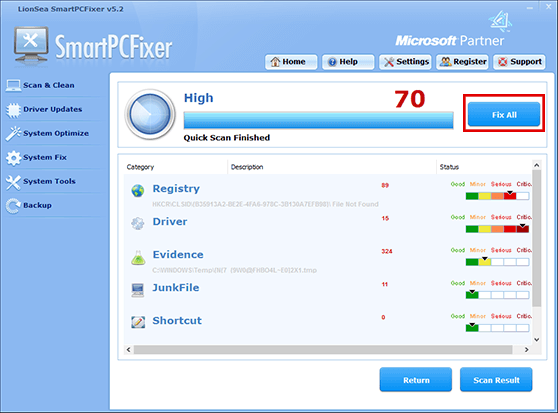
An efficient way to this Advrcntr3 Dll is to use SmartPCFixer. We highly recommend you to do the below steps.
1. Click the below button to download SmartPCFixer.

2. Launch SmartPCFixer and run a complete scan for your PC.
3. Click Fix all to get rid of Advrcntr3 Dll.
Get rid of Advrcntr3 Dll error mannually
1. Uninstall the application which you installed recently.
Go to Control Panel, choose Uninstall a program, right-click the application you want to uninstall and click Uninstall. It is deserved to mention that SmartPCFixer has the uninstall function which will largely save your time and fix errors efficiently.
2. Run a windows update to eliminate Advrcntr3 Dll error.
Click Start, Type windows update in the searching box and click check for update.
3. Run SFC to fix your windows system problems.
System File Checker is a useful tool included with Windows that allows you scan for and restore corruptions in Windows system files.
Click "Start" Button, and type CMD in the searching box. Right-click "CMD", then run as administrator.
At the command prompt, type the following command, and then press ENTER:
sfc /scannow
4. Start your PC in Safe mode with Networking and see if the error still pops up in Windows.
Click Start, type MSCONFIG, and click Boot from the pop up dialog. Tick Safe Boot in Boot Option, then select Network and Reboot the PC.
Tips & Warnings
1. You must run as an administrator, no matter what steps you will do about your PC.
2. Depending on the version of Windows you're using, the above steps may be slightly different, but the basic process is mostly the same.