Click the"Setting" button and you will see an interface as follow.
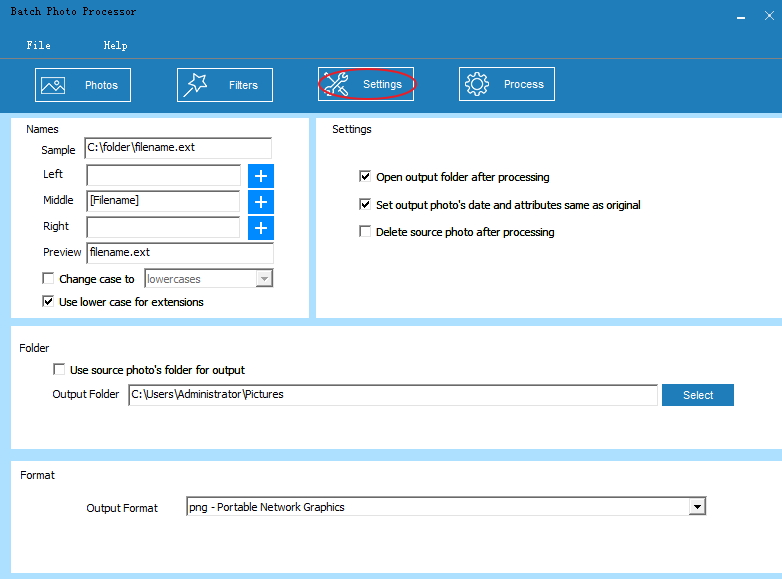
1. Set the name of the output picture.
[![]() ]:
The sample name format of name, it is default so you can’t input
new words into this text box.
]:
The sample name format of name, it is default so you can’t input
new words into this text box.
[![]() ]:
Input the left, middle and right content of the name. You can also
click
]:
Input the left, middle and right content of the name. You can also
click ![]() on the right to choose (“Source
Filename”, “Source Folder”, “Source Extension”, “Counter” “Date”
and “Time”).
on the right to choose (“Source
Filename”, “Source Folder”, “Source Extension”, “Counter” “Date”
and “Time”).
[![]() ]:
Preview the name you set.
]:
Preview the name you set.
[![]() ]:
Capitalize the name by ticking it and then choose
“UPPERCASES” (By default, it will not be
capitalized).
]:
Capitalize the name by ticking it and then choose
“UPPERCASES” (By default, it will not be
capitalized).
[![]() ]:
Capitalize the name by click it (By default, it will be
ticked.)
]:
Capitalize the name by click it (By default, it will be
ticked.)
2. Set the settings.
[![]() ]:
Tick it to open the output folder after the processing. (Ticked
defaultly)
]:
Tick it to open the output folder after the processing. (Ticked
defaultly)
[![]() ]:
Make the date and attributes of the output photo the same as the
original. (Ticked defaultly)
]:
Make the date and attributes of the output photo the same as the
original. (Ticked defaultly)
[![]() ]:
Tick it to delete the source photo after the processing.
]:
Tick it to delete the source photo after the processing.
3. Set the output folder for the output pictures.
[![]() ]:
Tick it to make the output picture in the same folder of the source
picture.
]:
Tick it to make the output picture in the same folder of the source
picture.
![]() :
Select the output folder for the output pictures.
:
Select the output folder for the output pictures.
4. Set the format of the output picture.
Choose from the “Output Format” list.